 David Bedford
 4868
4868
My role involves advising students and staff on literature searching, particularly searches carried out as part of a literature review. One aspect which people are asking about more frequently is the use of PRISMA. So, I thought that seemed like a good thing to write a blog post about.
What is PRISMA?
PRISMA (Preferred Reporting Items for Systematic reviews and Meta-Analyses) is a set of standards for accurate, transparent reporting of systematic reviews and meta-analyses. These standards were developed for the medical and health sciences, but can be useful for other disciplines such as business and education. Parts of the materials developed by PRISMA can be useful for other literature reviews as well, though all are designed with the very strict, detailed approach of a systematic review in mind.
The PRISMA statement comprises a checklist, a flow diagram and a number of extensions, all available from the PRISMA website. For most purposes within undergraduate and taught postgraduate study, the most relevant is the flow diagram, last updated in 2020.
Most of the people I talk to about PRISMA are not doing full systematic reviews, meaning the checklist and extensions are not relevant to them. The advice in this blog post considers only the flow diagram. If you are doing a full systematic review and are required to use the full PRISMA checklist, it is best to discuss this with both your librarian and your supervisor.
The PRISMA flow diagram is used to report the process of moving from the initial search for literature to the final list of papers included in the review. Is does not report how the search itself was carried out, but how the results of the search were filtered and refined.
When to use the PRISMA flow diagram
If you carry out a true systematic review, the use of the full PRISMA statement (or an equivalent) is essential. For other literature reviews, the PRISMA flow diagram is a useful way to document your process clearly, showing the thinking behind the way that your results have been narrowed and refined. You would normally only use the diagram if your search follows a systematic or highly structured approach.
Several courses recommend including the diagram as an appendix to your assignment. This means that it does not count towards your word limit. It is often used in conjunction with some sort of search diary which documents your search process. The PRISMA flow diagram is used to document the next steps you took. Don’t try to merge these two recording mechanisms into one.
It is only possible to use the PRISMA flow diagram if you use it from the beginning of your search process and complete it as you go along. This is because it requires keeping track of the number of records and papers involved in every step of your process. I have spoken to students who have tried to reverse-engineer the flow diagram shortly before submitting their work, but it is almost impossible to do so.
Completing a PRISMA flow diagram
The first step is to choose which flow diagram to use. There are two versions of the 2020 diagram, available from the PRISMA website. The choice of which to use depends on which methods have been used in the literature search.
The two options are:
- Searches of databases and registers only
- Searches of databases and registers, and other sources
For the purposes of this decision, databases refers to structured sources of information about academic journals (examples include Scopus, PsycINFO and MEDLINE), registers refers to online registers of clinical trials such as the World Health Organization’s ICTRP, and other sources refers to general internet searches, citation tracking, searches of organisations’ websites, recommendations from experts or any other method of identifying relevant literature that is not through the use of databases or registers. As you are the one who is carrying out the search, you will know which one is best for you.
As you move through the flow diagram, from top to bottom, the number of records involved decreases and the amount of detail increases.
Identification section
The first row of the flow diagram concerns identification, the initial results of your searches. The key box here asks you to report how many records were identified by your searches – a record being an entry in a database, a reference, or some other means of identifying the existence of a paper, article or abstract. These can be summarised, but a footnote to the flow diagram suggests separating out how many records were identified through each source – this is a useful thing to do for your own records as well as for reporting your process.
Next to each source, whether individual or summarised, indicate the number found. For example, if my search of the PsycINFO database found 58 records, I would indicate this by entering (n = 58). If you are using the “and other sources” version of the flow diagram, you will have two such boxes in the top row, one relating to databases and registers, the other relating to other sources.
The other box on the first row relates to any initial removal of records that is carried out. The most frequent of these is deduplication – if records on two different databases have identified the same paper, then we can remove the duplicates from the total to discover how many unique items have been found. This can be done by hand if there are small numbers of results, by using a tool such as Excel or by using a reference manager, many of which have deduplication tools built in. Michelle Crowther has written a handy guide to how to deduplicate using Refworks.
“Automation tools” in this box refers to highly specialised software designed for the systematic review process, so is unlikely to be relevant.
Subtracting the number of records removed at this point from the total identified will give you the number to enter in the first box in the next section. For example, if I identified 58 records in PsycINFO, 73 in MEDLINE and 19 in CINAHL, I would have a total of 150. If 40 of these were duplicates, I would be left with 110, which would be the number I enter in the first box of the next section.
Screening section
The flow diagram then moves on to the next stage, screening, working out which records, articles etc. are relevant. This follows three stages.
Screening stage one is to screen the records by examining the information available through the database. This will generally include titles, keywords, categories and an abstract – definitely not the complete text. You would screen these for relevance. By reading the titles and abstracts, you can work out why these records appeared in your search and establish whether they are relevant to your review. For example, in a mental health search using the word depression, it is possible that some records appeared where the word depression is used with a different meaning (it has at least five).
At this stage, it is not essential to indicate exactly why the records were screened out, though you may find it useful to make a note of this. However, if you use some sort of software to do some of this screening, you should indicate this.
Once again, the number excluded should be subtracted from the number screened to give the number to be entered in the next box. So if I screened 110 and excluded 70 of them by examining the title and abstract, I would be left with 40.
At this stage, you would begin downloading or borrowing or otherwise finding the actual articles, chapters, presentations etc. Or at least attempting to. The next line in the flow diagram gives an opportunity to note any reports (i.e. the actual texts) which could not be accessed for whatever reason.
The number not retrieved is subtracted from the number sought for retrieval, and this is the number of reports that you actually read. Again, they can be excluded at this stage, as reading the full paper may reveal reasons why it should not be included that weren’t obvious from the title or abstract. At this stage, you should give reasons why things were excluded, and how many were excluded for each reason. Generally, these reasons should relate to criteria that you have established in advance, as otherwise it could seem random.
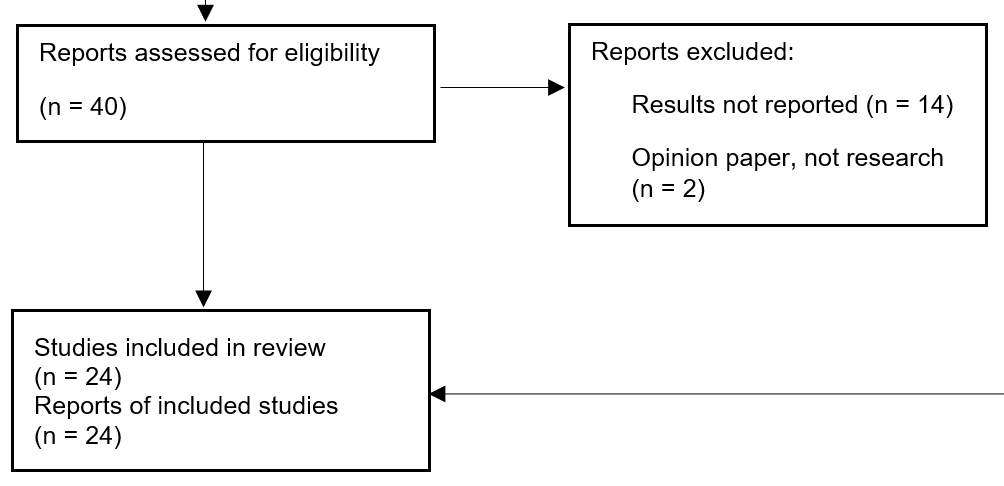
Included section
And finally, you have the total number of studies and reports to be included in your review. If using the “and other studies”, the two halves of the flow diagram come together only at this point. You may notice that the final box, the only one in the Included section, has two figures, one for studies and one for reports. Reports are the individually citable articles, papers etc. Studies is listed because some long-term research studies might report their results more than once, for instance after two years and after five years – the same study, but different reports.
As you move through the process and complete the flow diagram, you must ensure that you don’t “lose” any records or reports along the way. At each stage, the numbers should be logical – the number of reports assessed for eligibility minus the number of reports excluded should then equal the number of reports of included studies.
Referencing PRISMA
If you need to reference PRISMA, the authors recommend referencing one of the journal articles which present it rather than the website. They provide links to some potential articles on their Citing PRISMA page.
Cite and reference one of these articles in the same way that you would reference any other journal article in your work.


